
Delamination occurs when the bonded layers of materials within the structure of your RV begin to separate, leading to compromised integrity and aesthetic deterioration. This phenomenon is primarily observed in laminated surfaces, such as those used in the walls and roofs of RVs. The fundamental reason for delamination lies in the failure of the adhesive bonding that holds together the different materials.
As environmental elements like heat, moisture, and UV exposure act upon these layers, they can begin to break down the adhesives, leading to the peeling or bulging of surfaces.
Understanding the chemistry behind adhesives and the materials they bond can shed light on how to prevent such deterioration, thus allowing RV owners to maintain their vehicles more effectively.
Common Causes of Delamination in RVs – Spotting the Culprits
Several culprits contribute to delamination in RVs, with the most notable being water damage. Water intrusion, often from roof leaks or improper sealing, seeps into the laminate layers, causing the glue to weaken and promote mold growth and rot, which furthers the problem.
Another leading factor is thermal expansion and contraction. RVs are often exposed to extreme weather conditions, leading the building materials to expand in high temperatures and contract in the cold. Over time, this cycle can create stress on the adhesive bonds, leading to delamination.
Lastly, using poor-quality materials or improper construction methods can initiate delamination from the very start. By understanding these causes, RV owners can more readily implement preventive measures.
Signs of Trouble – How to Identify Delamination Early
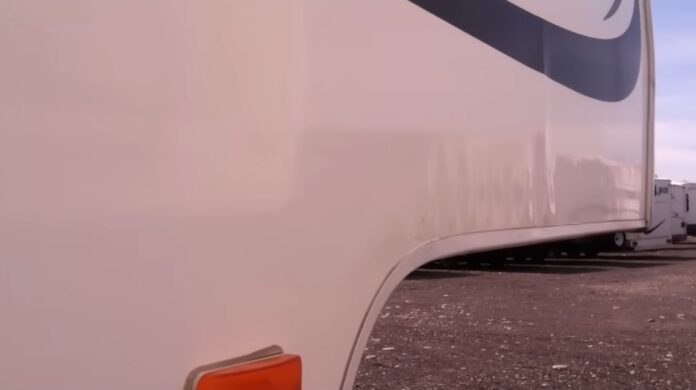
Early identification of delamination can save RV owners significant time and money on extensive repairs. One of the first signs is visible bulging or warping of the RV exterior, which may indicate that separation has already begun beneath the surface. Check for changes in texture or bubbling, especially around the edges of doors, windows, and seams.
Other indicators include a drop in insulation effectiveness, resulting in temperature inconsistencies inside the RV, and increased condensation on the walls during humid weather.
Listening for unusual sounds when tapping on the walls can also provide clues; if the sound differs significantly from surrounding areas, it might indicate a delaminated area. Regular inspections, especially after heavy rains or use, are crucial for catching these signs early.
Essential Tools and Materials for Tackling RV Delamination
Your Repair Toolkit – Must-Have Tools for the Job
To successfully repair RV delamination, having the proper tools on hand is crucial. A utility knife or razor blade should be at the top of your list, as it allows you to carefully remove damaged material without causing additional harm to the surrounding structure. You’ll also need a caulking gun to apply adhesives and sealants with precision.
A heat gun is particularly helpful during the process, as it softens existing adhesive and makes it easier to reposition or bond materials effectively. Clamps or weighted objects are important for keeping the layers firmly pressed together while the adhesive cures. In addition, a sturdy scraper will help you prepare the surface by clearing away old glue, debris, and contaminants that could interfere with proper adhesion.
Don’t forget essential safety gear such as gloves and protective eyewear to ensure safe handling of both tools and materials throughout the repair process.
Selecting the Right Adhesives and Sealants – A Guide
The selection of adhesives and sealants is a critical step in the repair process. Not all adhesives are suitable for the specific materials found within RV constructions. For delamination repair, choose high-quality, waterproof adhesives that are formulated for use with composite materials.
Epoxy adhesives are often favored due to their strong bonding capabilities and resistance to moisture. Polyurethane sealants also deserve consideration, as they offer flexibility and durability against environmental exposure. Always check manufacturer specifications to ensure compatibility with the RV materials and prior bonding agents used to prevent further issues.
The Importance of Quality – Choosing Materials That Last
Investing in high-quality materials pays off in the long run. Cheaper, lower-quality adhesives might save money upfront but often lead to repeated repairs or additional damage, thereby negating savings. Opting for well-reviewed, reputable brands is wise; these products are typically tested for longevity and effectiveness under various conditions.
Additionally, consider purchasing materials that come with warranties or guarantees, offering peace of mind that can reduce stress in the repair process. Ensuring the right materials may mean fewer visits to the repair shop and a better-resisted RV.
Step-by-Step Guide to Repairing RV Delamination Like a Pro
Preparing Your RV – The Crucial First Steps
Preparation is key in any repair process, and delamination is no different. Start by assessing the entire RV for any signs of delamination to establish the extent of the damage. Remove any furniture, fixtures, or coverings that obstruct access to the delaminated area.
Next, clean the surfaces thoroughly to remove dirt, moisture, and old adhesive remnants. A mixture of soap and water followed by a thorough drying is usually effective. It’s critical to allow the area to dry completely, as moisture trapped under the repair materials could lead to mold and further delamination. Ensure proper ventilation and, if possible, work in a controlled environment to optimize the adhesive curing process.
The Repair Process – Techniques for Effective Delamination Fixes
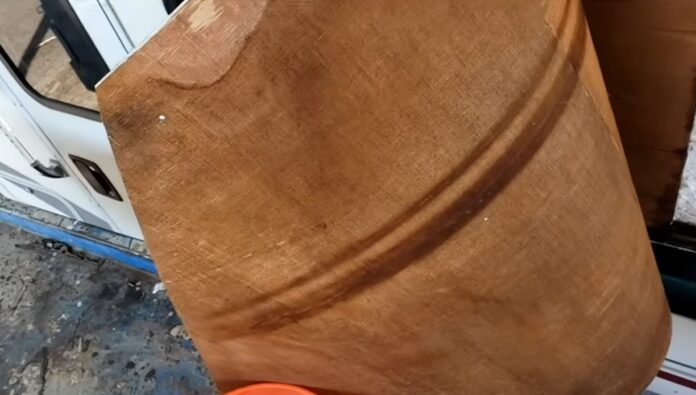
Once the area is prepped, begin the repair process by carefully cutting away the damaged portions of the laminate material. This might involve using your utility knife to remove delaminated sections cleanly to avoid rough edges. Then, apply the adhesive you selected, following all manufacturer instructions diligently. If using heat to soften the material, be careful not to overdo it, as this could warp the surfaces.
Carefully align and press the layers together, ensuring an even distribution of adhesive. Use clamps or weights to hold the bonded area securely in place until the adhesive fully cures, which may take several hours or even days, depending on the products used. Regularly check for visible signs of bonding during the curing process, and make adjustments as necessary.
Finishing Touches – Sealing and Protecting Your RV Post-Repair
After the adhesive has cured, the next step is to seal the edges of the repaired area to prevent any future moisture infiltration. This is where your polyurethane sealant comes into play. Apply a thin bead along seams, joints, and anywhere moisture could potentially enter, ensuring coverage and an attractive finish.
Follow up by inspecting the entire area for any additional repairs that may be needed. It is also imperative to wash and wax the cleaned areas to provide a protective layer against UV rays. Finally, establish a periodic inspection routine to monitor the integrity of your repairs and the overall condition of the RV.
Preventing Future Delamination – Proactive Strategies for RV Owners

Maintenance Checklist – Keeping Your RV in Top Shape
Establishing a comprehensive maintenance checklist is vital in preventing future delamination. Regularly inspect the RV for signs of leaks, particularly around the roof, windows, and doors, which are typically the most vulnerable points. Routine washing to remove dirt, sap, and other contaminants is essential in retaining the integrity of your RV exterior.
This should coincide with seasonal inspections where you assess weather-tight seals and protective coatings. Maintaining appropriate indoor humidity levels with dehumidifiers can also help prevent moisture accumulation and the onset of delamination. Keeping a log of inspections and repairs ensures nothing falls through the cracks and provides a historical overview to help spot trends.
Understanding Environmental Factors – How to Protect Your RV
Environmental factors play a significant role in the longevity of your RV. Parked or stored in areas with excessive sun exposure, high humidity, or extreme conditions contribute to material degradation over time.
Use a quality RV cover when the vehicle is not in use, or park in shaded areas to protect the roof and sides. Monitor water drainage patterns near the storage area; improper drainage can lead to pooling water and increase humidity levels around the RV.
Additionally, keeping the RV off the ground with jacks or pads can prevent any rot and allow proper airflow underneath. Understanding these environmental factors positions RV owners to implement protective measures proactively.
Investing in Upgrades – Enhancements That Prevent Delamination
For RV owners looking to minimize the risk of delamination and enhance their vehicle’s lifespan, strategic upgrades are beneficial. Consider applying higher-grade fiberglass exteriors resistant to the common causes of delamination. By investing in advanced construction techniques that involve stronger adhesives and moisture-resistant layers, RVs can be fortified against the elements.
Moreover, upgrading windows to double-pane options not only increases energy efficiency but also limits condensation buildup, which is a precursor to moisture intrusion. These investments may require initial financial outlay but can result in long-term savings by staving off repairs and extending the life of your beloved RV.


