
If you live somewhere with harsh winters, salted roads, coastal humidity, or even just regular rain and dampness, you already know one truth: rust shows no mercy. It creeps into seams, spreads across suspension parts, eats at the frame rails, and turns a perfectly good vehicle into a safety hazard.
The single best way to slow that process down is to undercoat your vehicle properly-not a quick spray, not a cosmetic touchup, but a complete, methodical job. Done the right way, rust undercoating can add years to the life of your car, van, or motorhome. Done poorly, it can actually trap moisture and speed up the damage.
The goal of this guide is to give you a clear, realistic, step-by-step process that works whether you do it yourself or take the vehicle to a professional. Everything below is based on real-world experience, realistic conditions, and mistakes people make far too often.
1. Why Rust Forms and Why Undercoating Actually Works
Rust happens when steel, oxygen, and moisture meet. Add winter road salt or coastal air and the process accelerates dramatically. Most factory coatings eventually wear off, especially around wheel wells, frame edges, weld points, and exposed metal near the suspension.
A proper undercoating:
- Blocks moisture and oxygen from reaching metal
- Cushions the underside from rock chips and debris
- Slows existing surface rust
- Protects seams and cavities where rust usually starts
This is why so many owners of older vans and motorhomes swear by yearly inspections and reapplications. These big vehicles have more exposed metal and more places for water to sit.
Below is a simple comparison of the most common undercoating types:
| Type of product | Ideal use | Pros | Cons |
| Wax-oil mixture | Older vehicles, seams, inner cavities | Creeps well, protects hidden areas, easy to renew | Needs annual refresh |
| Rubberized coating | Daily drivers, general road use | Good protection & sound-damping | Can trap moisture if applied over rust |
| Epoxy/urethane | Restorations, bare metal projects | Extremely durable | Requires perfect prep; not ideal on rusty surfaces |
| Lanolin-based sprays | Coastal climates | Natural, excellent creep into seams | Softer finish; needs maintenance |
Most DIY users benefit from a combination: oil/wax inside cavities and a tougher underbody coating on exposed surfaces.
2. Preparing the Workspace and Staying Safe
Undercoating is dirty work. You will be lying on your back, cleaning rust, spraying chemicals, and knocking off debris. Set yourself up properly so the job goes smoothly.
A good setup includes:
- A dry, shaded work area
- Wheel ramps or a jack with solid stands
- Floor coverings or cardboard to catch debris
- Nitrile gloves, goggles, and a respirator
- A bright work light
Do not skip protective gear. Underbody chemicals and rust dust are things you do not want in your eyes or lungs.
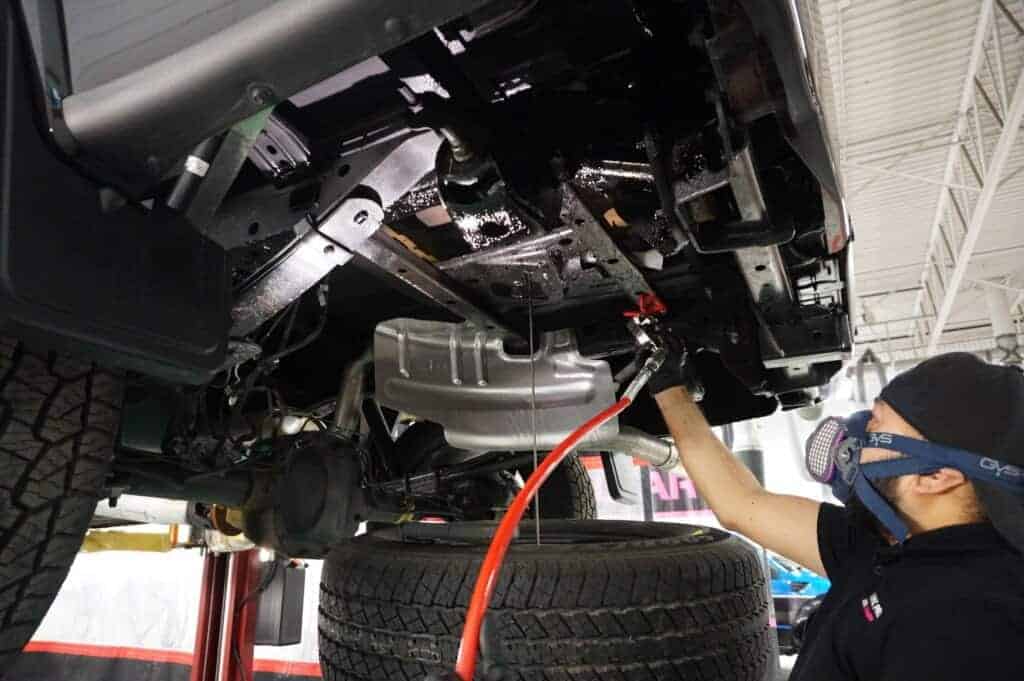
3. Step One: Clean the Underside Completely
This step takes the most time, but it changes everything. Spray the underside thoroughly using:
- A pressure washer
- Degreaser
- Long-reach brush
You want to remove mud, oil, old undercoating flakes, and any grime stuck to seams. A clean surface ensures your new coating bonds properly.
Important tip:
Motorhomes and vans often trap mud and salt behind plastic wheel arch liners. Remove them if possible—most people skip this and regret it later.
After cleaning, let the underside dry fully. Ideally, allow several hours, or even overnight.
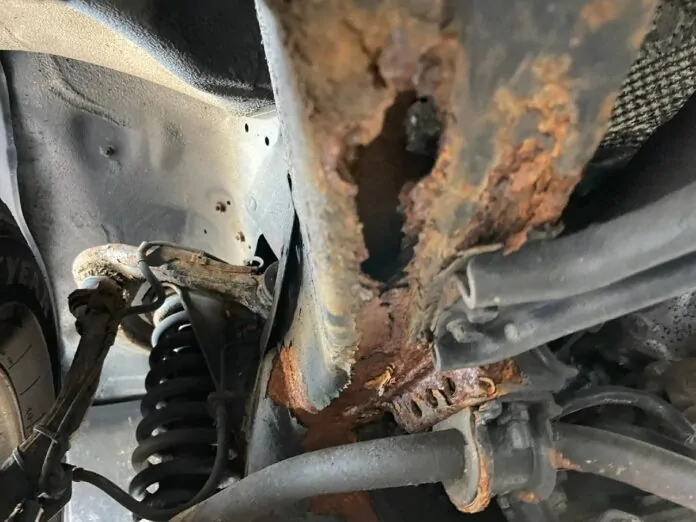
4. Step Two: Inspect the Metal and Identify Problems
With the dirt removed, you will finally see what you’re working with. Look for:
- Brown or flaky rust
- Bubbling paint
- Soft spots in the metal
- Rusted bolts or bracket edges
- Frame scaling
This is the moment when many DIYers discover surprises. The good news? Surface rust is manageable if treated correctly. Deep structural rust is another matter and may require welding. If you press on an area and it flexes or crumbles, don’t try to “hide it” with coating—fix it first.
5. Step Three: Remove or Neutralize Rust
Once you know what areas need treatment, start cleaning the rust. The method depends on severity.
| Rust level | Tool / treatment | Ideal result |
| Light surface | Wire brush, sanding pad | Clean bare metal |
| Moderate flaky rust | Drill-mounted wire wheel, rust converter afterward | Smooth, stable surface |
| Heavy scaling | Hammer & chisel, grinder, professional evaluation | Structural repair may be needed |
A good rust converter is helpful for areas that cannot be perfectly cleaned. It chemically stabilizes iron oxide and turns it into a paintable surface.
Take your time here. Rushing this step is the #1 reason undercoating fails prematurely.
6. Step Four: Mask the Parts You Do NOT Want Coated
Undercoating is designed to stick to anything—and it will. Mask off:
- Exhaust components
- Driveshaft
- Brake rotors
- Rubber bushings
- Suspension joints
- Sensors
On motorhomes, also mask propane lines, water tanks, and drainage valves.
Use plastic wrap, tape, and cardboard shields. Ten extra minutes of masking now prevents hours of cleanup later.
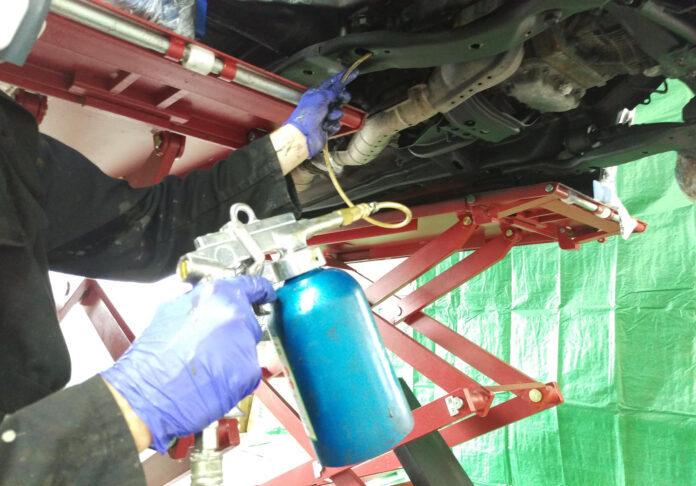
7. Step Five: Apply the Undercoating Carefully and Evenly
Now comes the part everyone looks forward to: the coating.
Shake the can or prep the sprayer thoroughly. Apply in slow, even passes.
General guidelines:
- Hold the nozzle at a consistent distance
- Apply 2–3 lighter coats rather than one heavy layer
- Pay extra attention to wheel wells and frame rails
- Let each layer cure before adding the next
On older vans and motorhomes, consider a dual system: wax-oil for seams and a tough rubberized layer on the flat surfaces. This protects both the exposed metal and the hidden “rust starter” areas.
8. Step Six: Treat the Cavities and Seams Separately
This is one step where professional shops shine, because they have long nozzle wands. But you can do it yourself, too.
Cavities include:
- Inside rocker panels
- Inside rear quarter panels
- Crossmembers
- Door bottoms
- Hidden body seams
A creeping wax/oil blend is best here. It flows inside folds in the metal and keeps moisture out. These are the exact places where rust begins long before you notice it.
9. Step Seven: Allow Proper Curing Time
Cure time depends on the product type:
| Product | Typical cure time | Notes |
| Rubberized | 12–24 hours | Don’t drive on gravel until fully cured |
| Wax-oil | 4–8 hours | Remains soft but stable |
| Epoxy/urethane | 24–48 hours | Needs perfect dryness and mild temperature |
Motorhomes especially benefit from letting the vehicle cure overnight in a warm environment, because large bodies trap moisture longer.
10. Step Eight: Maintenance and Annual Inspection
Undercoating is not a “once and done” upgrade. Every year, crawl under the vehicle—or have someone do it—and check:
- Wheel well edges
- Front corners of the frame
- Rear axle mounts
- Fuel tank straps
- Motorhome subfloor beamm
Touchup is easy if the original job was done right.
To keep everything in peak condition, many owners rely on professionals who specialize specifically in undersealing car treatments. Services like these offer full inspections, cavity protection, steam cleaning, and long-term maintenance—especially useful if you drive daily through snow and salt or own a large van or motorhome that simply cannot fit inside a home garage for DIY work.
Final Thoughts
A good undercoating job does not just protect the metal—it protects your investment, your safety, and your vehicle’s lifespan. Cars last longer, vans stay solid for work and travel, and motorhomes avoid the structural rot that ruins so many older rigs. The process takes time, and yes, it can get messy, but the payoff is worth it. Do it once, do it well, and your vehicle will return the favor for years.
If you want the maximum lifespan out of your vehicle, make rust prevention part of your yearly routine rather than something you think about only when rust becomes visible. By then, the damage is already far along. Start early, maintain consistently, and your undercarriage will stay in far better shape than most vehicles on the road today.


